Friday, April 11, 2014

Five Friday Faves

Image via// Eat & Relish

Disclaimer: The opinions and products reviewed and expressed below are chosen solely by me. I do not receive compensation to review these products and the products and services are simply ones in which I favor. My opinions are solely my own. If you’d like to be featured on FITO Blog please send me an email to arhicks0427@gmail.com


Happy Friday, Party People!!
I hope everyone enjoyed their week, and you are all looking forward to a fabulous weekend. 

I know we are!

Like I previously mentioned in my post last week here, I am was  going to share with you FIVE of my favorite things from each week to week.

Weellllllllllllll, {as I'm sure you're aware} I've been a little out of the blog world for a minute. To say that the hustle and bustle, and the overall craziness of life has gotten the best of my free time, would be a HUGE understatement.
But I'll spare you all the deets. 
(Like how my beloved doggie lost an eyeball over spring break, or that we BOUGHT A HOUSE, or that I am in wayyy over my head with Grad School and a million other things - I am sure you can relate)

So I am picking up where I left off, and decided to pick back up with my weekly top-picks, and I'm not looking back. 

Feel free to join in on the fun and comment with some of your week's faves.

Are you ready?
Let's Go!


1. Checkout51 app. - If you’re anything like me, you understand the feeling of running to the grocery store countless times on the fly during the week. Even if you can't relate, this App is for YOU! This App. is for everyone! Bye, bye to the days of coupon clipping. Or remembering to bring those pesky little sheets of paper with you to the grocery store. Oh, and, hello, clutter town. Ugh, I just hate, yet love coupons. I always wonder if it is really saving me any money to actually clip the darn things and then try to remember A: that you have a coupon for an item, or B: to bring your coupons with you to the store. Now, with Checkout51 you can literally EARN money as your grocery shop. Here’s how it works:
1. Browse through the weekly offers on the app
2. Purchase the products at ANY grocery store
3. Upload your receipt in the app, and claim your offers!


Easy, peasy. Once you earn $20.00 in your account Checkout51 will send you a check for the amount. Yeah, it's pretty awesome! Available on Apple and Android devices, and can be found in your app store.


2. 14 Hands Chardonnay - wow, I think it took me to write this blog post to realize that Chardonnay is spelled with 2 “N”s (World’s worst speller right here, ask my best friend). Anyway, I LOVE this Chardonnay wine from 14 Hands! It’s amazing how quickly one bottle of 14 Hands can disappear. Especially while you’re doing things like: chatting it up with your hubby on your blow-up mattress, in the middle of the living room, because you have yet to go pick out any furniture. OR during a Blogger Happy Hour (see below). OR while you’re chatting it up on the phone with your Momma for hours one evening. Then Poof it’s gone! Just like that! It really is that good!. So, do yourself a favor and go pick up a bottle (or 2, or 3) at your nearest Walmart… Yes, I DO buy my wine at Walmart. And, YES, you can buy your wine at Walmart too. And, pretty dang good wine at that! Plus, I wouldn't want to get too fancy on ya, and it’s reasonably priced.


3. The Crockpot - What a glorious device! With moving, being in between two residences (yes- we just bought our first home!! Whoo Hooo!), and the crazy schedule that is the end of the semester for teaching and Grad School, I have never needed, or loved, my crock-pot more than right now. And, let's face it, there are only so many times during the week that you can eat Subway or Taco Bell for lunch and dinner. A home cooked meal always hits the spot, especially if you've been having to grab meals on the go. So here’s the deal, I love to put stews, roasts, and other hearty meals in the Crockpot. You can prepare the dish in the Crockpot in the morning, then set the temp and let the Crockpot do all the work for you. Then, when you come home from a long and exhausting day you already have a delicious meal waiting, and typically your house smells pretty amazing too.


Easy, Hearty & Delicious


4. Blogger Happy Hours - So, I know lately it seems like I am obsessed with Erin, over at Living In Yellow (well, I guess I'm kinda am a little obsessed). Anyway, she is fabulous and you should definitely go check her blog out. Now back to the Happy Hour part. Erin (being the genius blogger that she is) put together this completely awesome idea called a “Blogger Happy Hour” (BHH). Once or twice a month she and another blogger host a Google+ Hangout with other like minded bloggers, including newbies (like myself) to chat all things Blog related. When you attend BBH you bring your questions, your favorite drink (for example, a bottle of 14 Hands Chardonnay, like yours truly), and pull up a chair. To your computer screen, that is. This month, Erin teamed up with the Hilarious, Taylor from The Daily Tay. BTW, Taylor has the most adorable dog, named Harlow. Which he joined in on our BHH, and all the girls swooned over him. Plus, those of us that join in were able to have Taylor and Erin's undivided attention for an hour or so. This past Tuesday I joined in on my first BHH with Erin and Taylor, along side some other awesome bloggers! It was so FUN, COOL, AWESOME, & totes AMAZING! Erin is hosting another BBH this month, you can check out all the deets here.


Cats & Dogs are welcome at this Happy Hour


5. Soft Cheese Tacos - WARNING: the following picture may not look appetizing. AT. ALL. But I don't care. These smothered, cheesy, Soft Cheese Tacos are the BOMB.com. I swear I think I could eat these every. single. day. Breakfast, lunch, AND dinner. When we began our move, the first night we stayed at our new house we decided to go out to eat to grab some dinner. We stopped in at a little Mexican food restaurant right off of the lake. One of many in the area, I might add. It looked very promising due to the fact the entire parking lot was full. So, we decided what the heck !? Gave it a shot. And, thank goodness! That evening I was introduced to my newest food love. This is the food you dream about and crave every single day. Seriously, I crave these on a daily basis. Thank goodness I don't eat them on a daily basis, but heck, I probably could! For reals. Every time we come up to the new house, our first stop is to get a whole platter full of soft cheese tacos. The rice and beans are a nice touch too. The restaurant also has this amazing dip they call “Crema”. Which is basically a mix of guacamole and sour cream - perfect to pair with their amazing tortilla chips and salsa. Next time you visit us at the new casa, I will be sure to take you to get a platter of soft cheese tacos. I don't know what more can I say - they’re simply AMAZE!

Ooey Gooey Cheesy Deliciousness

There ya have it folks, my top faves from the past week.

Feel free to join in on the fun and comment with some of your week's faves. I'd love to hear what you've been enjoying this week!

oxox, 
Amanda 


Thursday, April 10, 2014

Quick Tip - Use a Mason Jar


Question:
Is it just me, or is peeling a clove of garlic (or a shallot) one of the most frustrating  and  difficult tasks?

If you answered: 
Why YES! Yes, it is a difficult and frustrating task!!! 
Then keep reading.This blog post is just for you! 
And, hey, I just might even blow your mind a little bit.


Here's the deal.

To quickly and easily remove, or peel away, the skin from garlic cloves, a shallot, or even a small onion:
USE A MASON JAR

Not only does the skin just easily fall right off and separate from the garlic, it is also quite fun to shake the crap outta a little garlic clove, or two. 
It's kind of like revenge for all those times you've spent countless minutes trying to peel away the layers, and somewhat therapeutic.

By the way, speaking of Mason jars. I just have to say, I seriously love having a case of Mason jars around. I use them for all sorts of things like sipping some Sweet Iced Tea, to storing left over chopped lettuce in the fridge (perfect for your lunch salad), as well as containing things like: make-up brushes, loose buttons, sauces, dips. Whatever, you name it. Lids on or off, Mason jars are simply great to have around. Originally used for canning vegetables and jams -  (which is on my to-do list this Summer, #justsayin') they're great for that too.

So here's how you do it:
+ Place your garlic in the mason jar.
+ Screw on the lid tight with the outer ring.
 + Then, shake what your Momma gave ya! 
(shake those suckers hard!)
+ Shake the jar vigorously for a few seconds, 
ensuring that the cloves are hitting the sides and lid of the jar. 
+ Once the skin starts to separate from the clove, remove the cloves from jar
Be sure to remove any remaining pieces of skin on the cloves.


I like to break the garlic up into individual cloves, or peals (if ya wanna get fancy). That way the cloves all kind of bounce off of one another to speed up the skin removal process (that sounded just lovely).


Check out the proof


See all that skin sticking up and off the garlic cloves? 
Now you can just EASILY peel that remaining skin right off of the clove. 
There will also be some skin from the cloves remaining in your Mason jar.
Ahh, isn't it just wonderful?


Below are couple more different ways I frequently use Mason Jars

Storing freshly prepared Italian Dressing 
Recipe for the dressing can be found here


Mason Jars are also really great for storing fresh herbs


So I have to ask you.
Do you use Mason jars in your home or kitchen?
If so, what are some ways you use your Mason jars? 
I'd love to know, so be sure to comment below with some of your Mason jar tips, tricks, or uses.
I know I keep saying it, but aren't they just great?!


Wednesday, March 26, 2014

#1800MinuteChallenge Accepted

Happy Hump Day everyone!!
I hope you are all having a FABULOUS week!


Today, I wanted to share with you an exciting announcement AND an awesome opportunity!

One of my all time favorite bloggers, Erin over at Living In Yellow, is teaming up with three  incredible bloggers (Alissa from Alissa CircleEmily from The Freckled Fox, and Alycia from Crowley Party) to host the

#1800MinuteChallenge

Image via LivingInYellow

What the heck is a #1800MinuteChallenge, you say? 

Let me fill ya in on the deets:

Beginning April 1st (thru May 31st) I am joining forces, along with Erin, Alycia, Alissa, and Emily and a whole bunch of other awesome ladies to challenge ourselves, and commit to completing 1800 minutes of physical activity within the next 60 days!
(You can also read ALL about it here)

Why?
Well, because, let's be honest here, Swimsuit season is UPON us! (ahhhh!)
And, to say I've been needing to get into the habit of a fitness regimen and STICK with IT, would be a huge understatement. 

I thought this would be the perfect opportunity!
(and not to mention there's a grand prize drawing at the end for those who complete the 1800 minutes)

I love this challenge for a few reasons:

#1: ANYONE can participate. 
It doesn't matter if you're a fitness guru or never stepped foot on a treadmill.
Just get your fitness on, and you'll be good to go.

#2: This challenge is such a DOABLE, and obtainable goal. 
You can schedule your minutes however you'd like. Want to do 10 minutes today, 45 tomorrow, none the next? You CAN! 
As long as you can do 1800 minutes in 60 days, you've reached the goal!
(All in all it really equates to only about 30 minutes of physical activity)
Can we say VICTORY!!

#3: and, lastly, you'll have the SUPPORT of other awesome bloggers, followers, and kick-ass women all over the country that can help cheer you on, and provide you with a wealth of fitness tips, guide, tools and knowledge via Instagram, Twitter, Blogs ect. 
How cool is that?!
Pretty freakin' COOL!

So, are you willing to accept the #1800MinuteChallenge with me? 

Let's get moving, grooving, into shape and ready for those bikinis!

Ready to sign up?
Head over to Erin's post here and fill out the quick the survey to sign up. 
That's it! Super easy! 

I can't wait to take on this challenge with YOU!

oxox, 
Amanda 

Monday, March 24, 2014

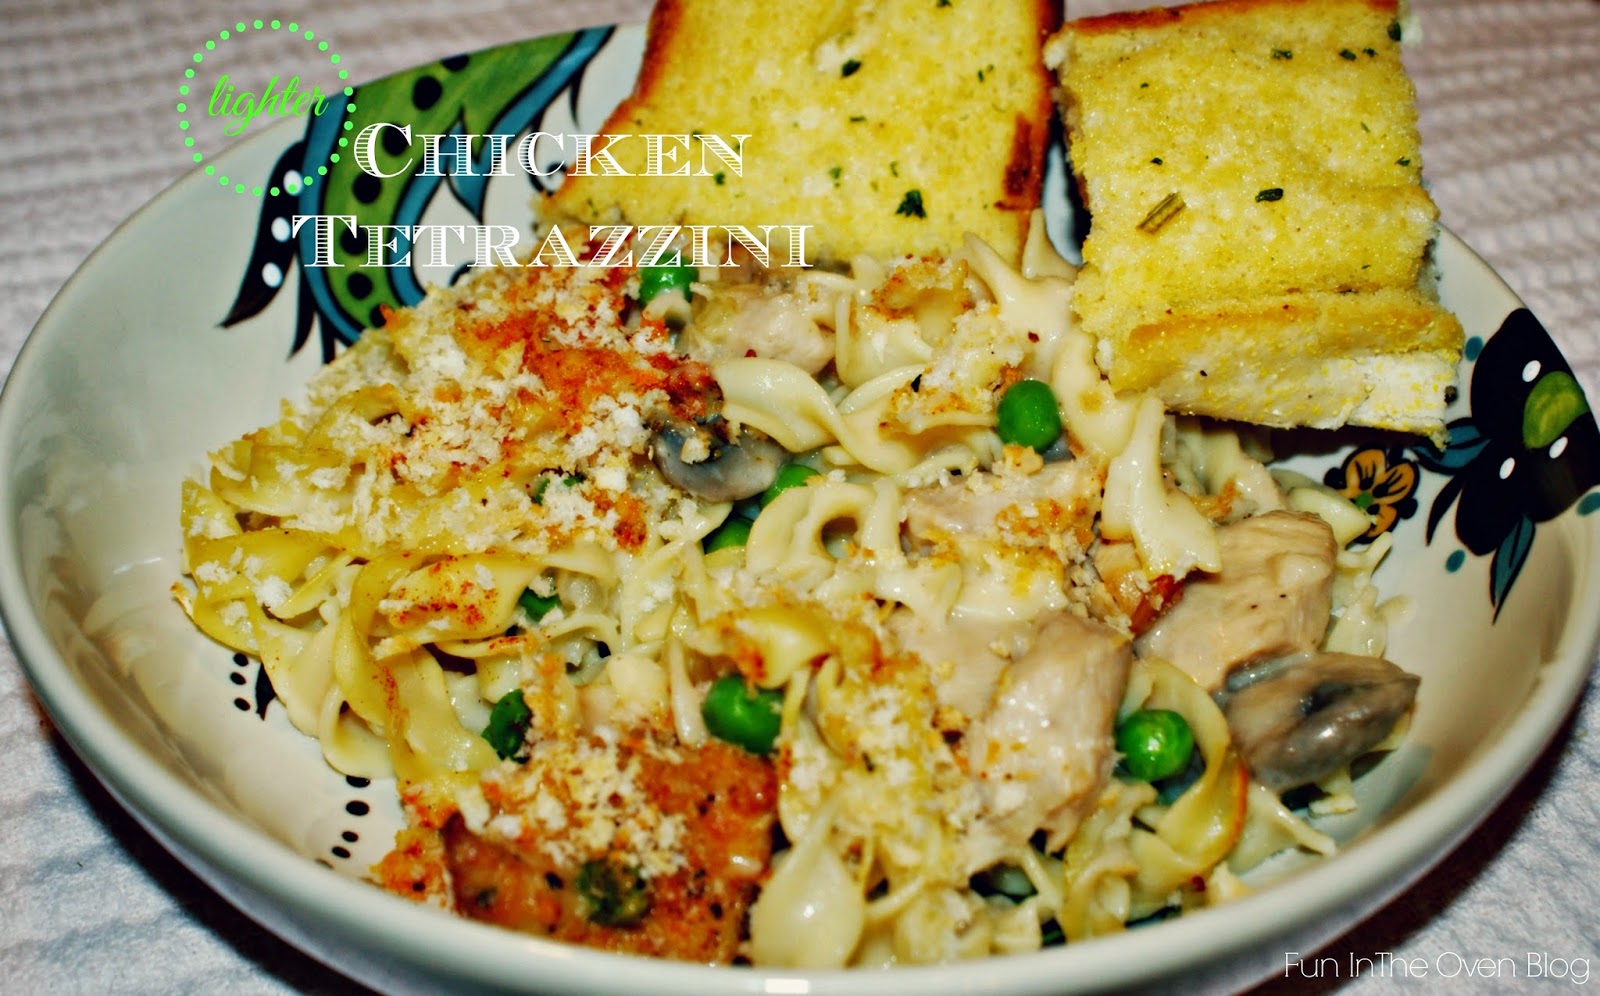
{lighter} Chicken Tetrazzini


Chicken Tetrazzini is one of those great dishes that are so versatile yet so satisfying.
If you're serving up Chicken Tetrazzini you  really can't go wrong. 

I came across this lightened-up version of the recipe in my Comfort Foods Makeovers cookbook by America's Test Kitchen. 
(This is one cookbook I really cherish and  love oh so much!! I know you will too and can purchase the cookbook here).

One thing that I really love about this dish is that you can make this casserole ahead of time,  store it in the fridge until you're ready to eat, and then just simply pop in the oven - making it a quick, no-fuss week night meal. 

This dish is also packed with satisfying and healthy ingredients, like lean chicken breast, mushrooms, and peas.

This particular (lightened-up) version calls for a cup of frozen peas, and I must admit  I was very a little skeptical at first.
However, and much to my surprise, the peas give this dish such a great texture with the added benefit of vegetables. 
Needless to say, I am a skeptic no longer! 
And, let's also just say, I'll never make Chicken Tetrazzini with out them!

With the addition of the frozen peas, it also made me ponder what other veggies I could add.
Carrots?  Celery? Finely chopped Bell-Peppers? Maybe even some broccoli?!!
Yes, I'll definitely be giving the broccoli idea a try one of these days.

Anyway, broccoli, peas, and peppers aside, this dish is definitely a keeper!
{lighter} Chicken Tetrazzini is a husband-friendly (and I assume kid-friendly) dish that the whole family will be sure to love. 

If you've never had Chicken Tetrazzini before, you must give it a try! 
I promise you won't be dissatisfied.

{lighter} Chicken Tetrazzini

(the order of events)


Begin by trimming the fat from your chicken and cut your chicken breasts into 1/4 inch pieces. 
Add your chicken pieces to a bowl.


Marinate chicken with soy sauce, garlic salt and pepper. Cover with plastic wrap, and refrigerate for 30 minutes to 1 hour.
(BTW, I found out this process makes your chicken super flavorful and extra tender)

Meanwhile, begin cooking your egg noodles. Cook until al dente.

Melt one tablespoon of butter in a 12-inch skillet over med-high heat. 
Add your mushrooms and onions, as well as some garlic salt and pepper (to taste).
Cook until golden brown. 
Next, add your flour and continue to cook for about 2 minutes, or until golden. 
Next, whisk in the broth and sherry and bring to a simmer. 
Add cream cheese and 6 tablespoons Parmesan cheese. 
Simmer until slightly thickened. 
Next, grab your marinated chicken and a cup of frozen peas and add them to your skillet.
Simmer for a couple of minutes. (note: the chicken is not fully cooked)
Next, add the al dente noodles to a large bowl and pour in the chicken & peas mixture. 
Toss together, or stir to combine.


Once everything is nice and combined add it to a square baking dish. 
Top with breadcrumbs, remaining parm. cheese, salt and pepper to taste. 
(I also like to add a few dashes of paprika for extra flavor. 
Pop it in the oven at 400 degrees, for about 12 to 14 minutes, or until hot all the way through.
Let cool for a few minutes before serving. 


You can also use cooked turkey, making this a must have for Thanksgiving left overs. 


{lighter} Chicken Tetrazzini

Ingredients:


  • 12 ounces boneless, skinless chicken breast (cut into 1/4- inch pieces)
  • 2 tablespoons soy sauce (use low-sodium for a lighter option)
  • ounce bag medium egg noodles
  • 1 tablespoon butter
  • 8 ounces sliced mushrooms
  • 1 white onion, chopped fine
  • 2 tablespoons all-purpose flour
  • 1 cup low-sodium chicken broth
  • 2 tablespoons sherry
  • 3 ounces neufchatel cream-cheese, softened
  • 1/2 cup grated Parmesan cheese
  • 1 cup frozen peas
  • 1/2 cup panko bread crumbs
  • garlic salt & pepper (to taste)
  • a few dashes of paprika (optional)


  • Directions:


    • Heat oven to 400 degrees
    • Combine chicken pieces soy sauce, garlic salt and pepper in a bowl - Cover and refrigerate for 30 minutes to 1 hour.
    • Cook egg noodles, just al dente, according to package directions (reserve 1 cup of cooking water)
    • While pasta is cooking, melt butter in a 12-inch skillet over medium-high heat
    • Add mushrooms, onions, 1/2 tsp. garlic salt, 1/2 tsp. pepper and cook until browned (about 6-8 minutes)
    • Stir in flour and cook an additional 2 minutes, or until golden brown
    • Next, whisk in broth, sherry, and reserved cooking water, scrapping up any brown bits, and bring to a simmer.
    • Whisk in cream cheese and 6 tablespoons Parmesan cheese and simmer about 1 minute, until slightly thickened
    • Stir in marinated chicken and peas, simmer gently for about 1 minute (note: chicken will not be fully cooked)
    • Add chicken mixture to cooked pasta in a large bowl, and toss to combine
    • Transfer chicken and pasta mixture to square baking dish
    • Top with panko and remaining Parmesan cheese, salt, pepper, and a few dashes of paprika (optional) to taste
    • Bake about 12 - 14 minutes until hot throughout
    • Let cool slightly before serving
    • Enjoy!


    Tuesday, February 11, 2014

    Sweet 'n' Salty Raspberry Kisses {Valentine's Day Treats}


    Have you heard?

    Valentine's Day is right around the corner....

    That's right, Friday is the big V-day.

    So let's make something you can share with your loved ones, co-workers, friends, and, of course, your lover.

    These fun and delicious little Raspberry Kisses are the perfect treat.
    Spread some love, treat yourself, and enjoy all that is Valentine's Day. 

    These are SO great! A little sweet. A little salty. AND only 3 Ingredients (+ sprinkles)

    Here's what you'll need
    For these Sweet 'n' Salty Raspberry Kisses you'll need:
    • A bag of pretzels (I like the square ones)
    • A small bag of White Chocolate kisses
    • A small bag of Raspberry MnM's
    • + fun sprinkles of your choice (optional)

    Here's what you do

    Kisses topped Pretzels

    Lay a few pretzels on a microwave safe dish.
    Place one kiss on top of each pretzel (pictured above).

    Melted Kisses

    Place the dish in the microwave and begin microwaving the kisses and pretzels in 20 to 30 second intervals.

    Once they are beginning to melt remove from microwave (they will look like the picture above).

    BE CAREFUL!!!! when removing from microwave -The plate may be HOT!

    Next, top each Kiss/Pretzel with one M'n'M and smush it down while the chocolate is still warm.

    Top with sprinkles.

    Let them cool as you make your next batch. 

    Cooling Treats

    After the treats have cooled, pack them up in a fun tin or box and let them cool over night in the fridge. 

    Pass them out and make someone's day!!

    Easy, fun, and just lovely.

    Wishing you all a wonderful Valentine's Day, and sending each of you lots-of-love!

    I hope you have as much fun making these as I did.

    Enjoy,
    Amanda 


    Thursday, February 6, 2014

    Bacon & Blue Hamburger Steaks with Mushrooms


    I don't know what it is about a Hamburger Steak, but man 'o' man, are they DELICIOUS!!

    Never heard of such a thing? 

    Let me fill ya in...
    ahhhh the Hamburger Steak. Simply put, the hamburger steak is a patty that is supposed to be representative of a "steak" in shape, but is made out of ground beef just like a burger, yet it isn't sandwiched in between two buns with all the fixin's. Instead, a Hamburger Steak can be topped with anything your creativity and imagination can think of. 
    Not to be confused with a Salisbury steak, which is made with minced beef, the hamburger steak is something to behold, and easily made out of your regular ole ground beef. 
    Nothing too fancy, right? 

    Unless you top it with Blue Cheese, Mushrooms, and BACON JAM! 

    Yes, you heard it here first!
    BACON JAM!!!

    This stuff is the JAM!! (pun intended)


    Prepared Hamburger Steak Patties

    Topped with Bacon Jam & Blue Cheese

    Bacon and Blue Hamburger Steaks 

    (adapted from HEB)

    Ingredients:

    • 1 lb. extra lean ground beef
    • 1/4 cup chopped green onions
    • 1/2 cup Blue Cheese crumbles
    • 4 heaping tablespoons of Bacon Jam
    • 8 oz. sliced Mushrooms
    • 1 tsp. Garlic Salt
    • Pepper to taste

    Directions:

    • In a large bowl,combine ground beef, green onions, garlic salt, and pepper. Mix well and form beef into 4 equal sized patties.
    • Next, spray a large skillet with non-stick cooking spray over medium heat. Sauté mushrooms until well browned. Remove mushrooms from skillet and set aside in a bowl.
    • In the same skillet, re-spray with non-stick cooking spray then add the four patties. Cook for 6 minutes on one side. Flip the patties and add 1 tbsp. of bacon jam to each patty. Top each patty with Blue Cheese crumbles. Cover and cook until cheese begins to melt.
    • Next, remove the patties from the skillet, add to a plate, and top with the sauteed mushrooms.
    • Serve & Enjoy!